Google Cloud Storage Screenshot Upload
Capture screenshots with the AddScreenshots Screenshot API and upload them directly to Google Cloud Storage buckets. Keep every render inside your GCP project while benefitting from no-throttle concurrency, scheduling, and metadata capture.
- Service account control: Authenticate uploads using JSON key files and your own IAM roles.
- Bulk-ready patterns: Name folders/files using templates, store HTML, and include structured metadata.
- Automation workflows: Combine with cron scheduling, webhooks, and change detection for audit trails or monitoring.
How to Upload Images to Your GCP Bucket
The following parameters are available for uploading screenshots to your GCP bucket:| Parameter | Required | Description |
|---|---|---|
| bucket | Required | The name of the bucket (e.g., my-screenshots) |
| gcp | Required | The GCP credentials found in the service accounts credentials JSON file. More information below on how to set up the credentials. Example:
{
 "type": "service_account",
 "project_id": "your-project-name",
  ...
} |
| metadata | Optional | Add descriptive metadata properties to the screenshot |
| file | Optional | The name or pattern for the file without the extension The default is a unique identifier (see pattern examples) |
| folder | Optional | The folder name or pattern for the file (see pattern examples) |
| html | Optional | When set to true, the HTML markup will be uploaded too |
How to Set Up Your GCP Bucket
Here is a collection of links to the official documentation:
- Select or create a Cloud Platform project
- Enable billing for your project
- Enable the Google Cloud Storage API
- Set up Application Default Credentials (ADC)
- Create a bucket
Get the Credential File and Grant Access to Storage
- Go to Google Cloud Console.
- Select or create a Google Cloud Platform project
- Select the IAM & Admin menu
- Go to the Service Accounts tab on the IAM & Admin menu, and create a new service account
- Provide the service account details such as a name and description
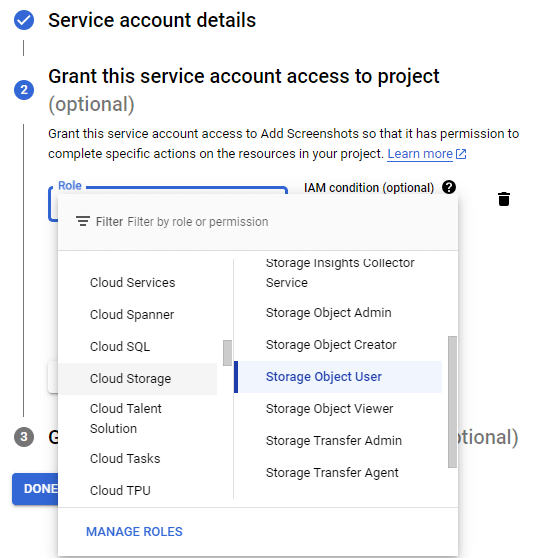
- Grant the service access to the project by selecting "Cloud Storage" and "Storage Object User" as shown below

- Click on the Service Account that was created in the previous section
- Go to the KEYS tab and click on "ADD KEY" > "Create new key"
- Select "JSON" as the key type
- The JSON credentials file should download automatically
The JSON credentials file should contain data in the following format. Use this data in the gcp parameter.
{
  "type": "service_account",
  "project_id": "your-project",
  "private_key_id": "123456",
  "private_key": "-----BEGIN PRIVATE KEY-----\n-----END PRIVATE KEY-----\n",
  "client_email": "[email protected]",
  "client_id": "123456",
  "auth_uri": "https://accounts.google.com/o/oauth2/auth",
  "token_uri": "https://oauth2.googleapis.com/token",
  "auth_provider_x509_cert_url": "https://www.googleapis.com/oauth2/v1/certs",
  "client_x509_cert_url": "https://www.googleapis.com/robot/v1/metadata...",
  "universe_domain": "googleapis.com"
}
Upload a Single Screenshot to Your GCP Bucket (Real-Time POST Request)
The example below shows how to take a real-time website screenshot and store the image in a GCP bucket "screenshots-demo" in the "images" folder with the file name "website.png". The optional &html=true parameter will upload the "website.html" file to the GCP bucket as well. Note that the "gcp" properties are the content from the JSON credentials file.
POST https://api.addscreenshots.com/screenshots?apikey=YOUR_API_KEY

{
  "url": "https://www.example.com/",
  "gcp": {
    "type": "service_account",
    "project_id": "your-project",
    "private_key_id": "123456",
    "private_key": "-----BEGIN PRIVATE KEY-----\n-----END PRIVATE KEY-----\n",
    "client_email": "[email protected]",
    "client_id": "123456",
    "auth_uri": "https://accounts.google.com/o/oauth2/auth",
    "token_uri": "https://oauth2.googleapis.com/token",
    "auth_provider_x509_cert_url": "https://www.googleapis.com/oauth2/v1/certs",
    "client_x509_cert_url": "https://www.googleapis.com/robot/v1/metadata...",
    "universe_domain": "googleapis.com"
  },
  "bucket": "screenshots-demo",
  "file": "website",
  "folder": "images",
  "html": true
}
Your API key can be found on the API Keys page. Need an API Key? Sign up to get started.
For internal applications, replace YOUR_API_KEY with your own unique API Key.
For public facing websites or hotlinks, generate a signed URL.
The API response will include a link to the screenshot in your GCP bucket as shown below:
{
  "success": true,
  "message": "Screenshots completed.",
  "storage_provider": "gcp",
  "images": [
    {
      "folder": "images",
      "file": "website.png",
      "request_url": "https://www.example.com/",
      "page_url": "https://www.example.com/",
      "image_url": "https://storage.cloud.google.com/screenshots-demo/images/website.png",
      "uploadTime": 2000,
      "size": 31094,
      "page_load_time": 2044,
      "website_status": 200,
      "website_status_text": "",
      "page_process_time": 1,
      "page_loadtime_ms": 42,
      "html_url": "https://storage.cloud.google.com/screenshots-demo/images/website.html"
    }
  ]
}
Upload Multiple Screenshots to a GCP Bucket (POST Request)
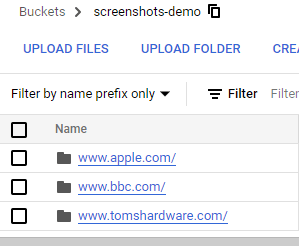
The example below shows how to take multiple screenshots using a POST request and upload the images to a GCP bucket "screenshots-demo", where the screenshots are stored in the folder {domain} (pattern) with the filename {filepath} (pattern).
POST https://api.addscreenshots.com/screenshots/bulk/multi?apikey=YOUR_API_KEY

{
  "urls": [
    "https://www.apple.com/ipad/",
    "https://www.apple.com/iphone/",
    "https://www.apple.com/watch/",
    "https://www.bbc.com/news/world",
    "https://www.bbc.com/news/technology",
    "https://www.tomshardware.com/news/raspberry-pi",
    "https://www.tomshardware.com/best-picks"
  ],
  "gcp": {
    "type": "service_account",
    "project_id": "your-project",
    "private_key_id": "123456",
    "private_key": "-----BEGIN PRIVATE KEY-----\n-----END PRIVATE KEY-----\n",
    "client_email": "[email protected]",
    "client_id": "123456",
    "auth_uri": "https://accounts.google.com/o/oauth2/auth",
    "token_uri": "https://oauth2.googleapis.com/token",
    "auth_provider_x509_cert_url": "https://www.googleapis.com/oauth2/v1/certs",
    "client_x509_cert_url": "https://www.googleapis.com/robot/v1/metadata...",
    "universe_domain": "googleapis.com"
  },
  "bucket": "screenshots-demo",
  "file": "{filepath}",
  "folder": "{domain}",
  "quality": "80"
}
The API response will include the number of screenshots as shown below:
{
  "message": "The screenshots are being processed.",
  "screenshots": [
    "https://www.apple.com/ipad/",
    "https://www.apple.com/iphone/",
    "https://www.apple.com/watch/",
    "https://www.bbc.com/news/world",
    "https://www.bbc.com/news/technology",
    "https://www.tomshardware.com/news/raspberry-pi",
    "https://www.tomshardware.com/best-picks"
  ]
}
The folders and file names as they appear in the GCP bucket: 
Keep your screenshot archive inside Google Cloud today. Explore plans or create an API key to start uploading.