Azure Blob Storage Screenshot Upload
Capture website screenshots with the AddScreenshots Screenshot API and deliver them directly to Azure Blob Storage. Maintain unlimited concurrent jobs, store HTML alongside PNGs, and keep every asset inside your Azure tenancy.
- SAS-based security: Use container-level Shared Access Signatures to control exactly who can upload.
- Bulk-friendly: Process URLs, sitemaps, or domain scans with folder/file patterns and metadata.
- Automation ready: Pair with scheduling, webhooks, and change detection for a complete monitoring loop.
How to upload images to your Azure Storage Account
The following parameters are available when uploading screenshots to Azure.| Parameter | Required | Description |
|---|---|---|
| azure | Required | Shared Access Signature Container URL with a SAS token such as https://your-account.blob.core.windows.net/container-name?st=... |
| metadata | Optional | Add descriptive metadata properties to the screenshot |
| file | Optional | The name or pattern for the file without the extension The default is a unique identifier (see pattern examples) |
| folder | Optional | The folder name or pattern for the file (see pattern examples) |
| html | Optional | When set to true, the HTML markup will be uploaded too |
How to generate a Shared Access Signature (SAS)
A shared access signature (SAS) provides secure delegated write-access to your storage account without compromising the security of your data. Read-access (optional) is required if you'd like to compare screenshots and track screenshot changes over time.
See the official Microsoft documentation on SAS security.
There are several ways to create a SAS URI.
To create the SAS URI programmatically, follow the New-AzureStorageBlobSASToken PowerShell documentation.
The guide below will use the Azure Storage Explorer (available via a free download from Microsoft).
- Open Azure Storage Explorer
- Navigate to your storage account and container that will store your screenshots
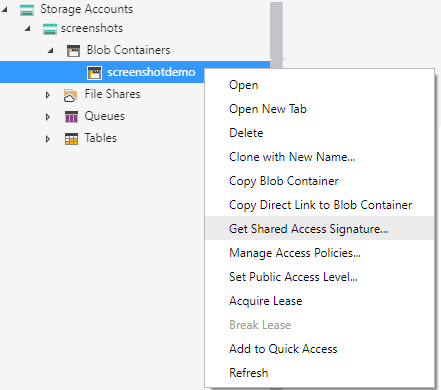
- Right-click on the container name and click "Get Shared Access Signature..."

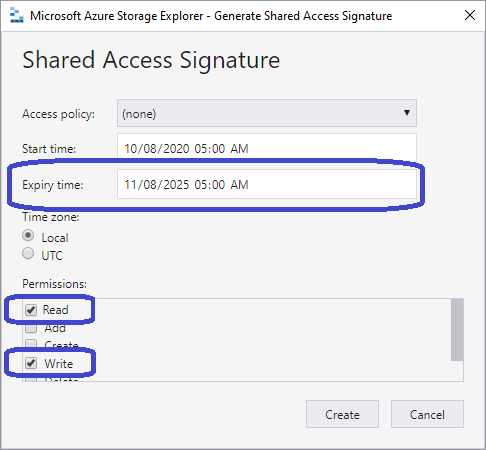
- Define a time period (e.g. 1-year expiry) for the SAS token and check the Write permission.
Check the Read permission (optional) to track screenshot history.
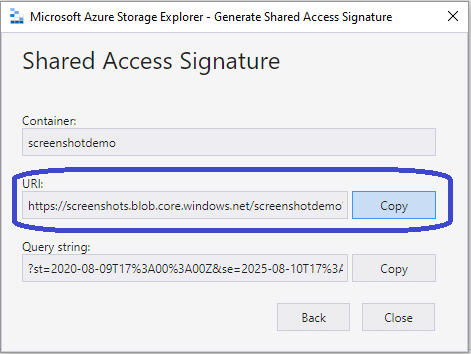
- Click Create and Copy the URI as the SAS token

Upload a single screenshot to Azure Blob Storage (real-time GET request)
The example below shows how to take a real-time website screenshot and store the image in an Azure container in the "images" folder with the file name "website.png". The optional &html=true parameter will upload the "website.html" file to the Azure container as well.
Please note that the SAS token must be a base64 encoded string when used as query parameter.
// Line breaks added for readability https://api.addscreenshots.com/screenshots
?apikey=YOUR_API_KEY
&azure=base64-encoded-sas-uri
&folder=images
&file=website
&html=true
&url=https://www.youtube.com
Your API key can be found on the API Keys page. Need an API Key? Sign up to get started.
For internal applications, replace YOUR_API_KEY with your own unique API Key.
For public facing websites or hotlinks, generate a signed URL.
The API response will include a link to the screenshot in your Azure container as shown below:
{
  "success": true,
  "message": "Screenshots completed.",
  "storage_provider": "azure",
  "images": [
    {
      "file": "website.png",
      "request_url": "youtube.com",
      "page_url": "https://www.youtube.com/",
      "image_url": "https://screenshots.blob.core.windows.net/screenshotdemo/images/website.png",
      "html_url": "https://screenshots.blob.core.windows.net/screenshotdemo/images/website.html",
      "size": 1711983
    }
  ]
}
Uploading multiple screenshots to Azure (POST request)
The example below shows how to take multiple screenshots using a POST request and upload the images to an Azure container where the screenshots are stored in the folder {domain} (pattern) with the filename {filepath} (pattern).
POST https://api.addscreenshots.com/screenshots/bulk/multi?apikey=YOUR_API_KEY

{
  "urls": [
    "https://www.apple.com/ipad/",
    "https://www.apple.com/iphone/",
    "https://www.apple.com/watch/",
    "https://www.bbc.com/news/world",
    "https://www.bbc.com/news/technology",
    "https://www.tomshardware.com/news/raspberry-pi",
    "https://www.tomshardware.com/best-picks"
  ],
  "azure": "https://screenshots.blob.core.windows.net/screenshotdemo?st=2020-08-10T07%...fEWvNz6fbdeUenY%3D",
  "file": "{filepath}",
  "folder": "{domain}",
  "quality": "80"
}
The API response will include the number of screenshots as shown below:
{
  "message": "The screenshots are being processed.",
  "jobId": "e0ab7f5ec3584ac29b5291806a6f3567",
  "screenshots": 7
}
Look for the Job ID on the Usage Logs page to track the request.
Ready to centralise screenshots inside Azure? View pricing or create an API key to start uploading captures now.
The folders and file names as they appear in Azure storage: 
How to view screenshot metadata
Additional metadata will be written to the screenshot image when the "metadata" parameter is set to true.
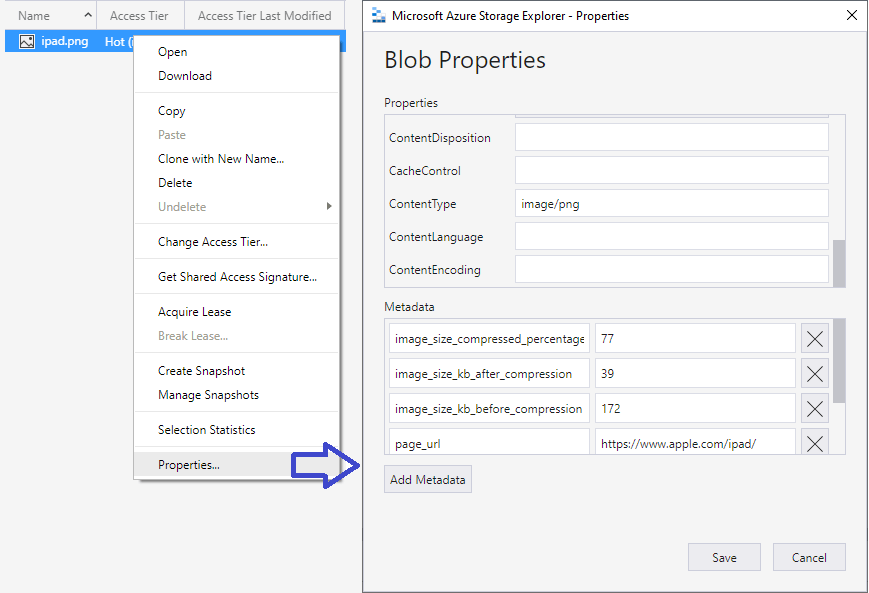
To view the metadata in Azure Storage Explorer, right click on the image and click "Properties" as shown below. 
The metadata may contain information such as:
- website_status - the status response from the website such as 200
- url - request URL entered such as apple.com/ipad
- page_url - page URL after browser redirection as https://www.apple.com/ipad
- page_loadtime_ms - page load time in milliseconds
- Compression Enabled (e.g. &quality=80)
- image_size_kb_before_compression - the original size of the screenshot before compression such as 172 KB
- image_size_kb_after_compression - the size of the screenshot after compression such as 39 KB
- image_size_compressed_percentage - the compression optimization / saving such as 77%